HSTS (HTTP Strict Transport Security) is a security policy where a web server instructs the client that the website they are calling can be used with HTTPS only. By using tools like Wi-Fi PineApple and sslstrip a man-in-the-middle attack can be carried out easily. The attacker can redirect the victim to HTTP version of the site they are connecting to and after the login info is submitted in clear-text and captured the victim is redirected back to HTTPS. By using HSTS the client browser always makes the calls over HTTPS hence reducing the risk of MitM attack. It’s not bullet-proof but still an improvement over not using it.
Implementation
HSTS is basically a response header. In an ASP.NET application it can be added in the web.config file as below:
  <system.webserver>
    <httpprotocol>
      <customheaders>
        <add name="Strict-Transport-Security" value="max-age=31536000" />
      </customheaders>
    </httpprotocol>
  </system.webserver>
And when you visit this site over HTTPS response looks like:
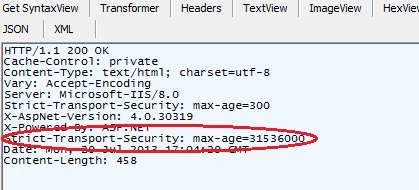
This header tells the browser to use only HTTPS from now on for 1 year. Also, the response header can be added in the BeginRequest event handler:
protected void Application_BeginRequest(object sender, EventArgs e)
{
	protected void Application_BeginRequest(object sender, EventArgs e)
	{
		switch (Request.Url.Scheme)
		{
			case "https":
				Response.AddHeader("Strict-Transport-Security", "max-age=31536000");
				break;
			case "http":
				var path = "https://" + Request.Url.Host + Request.Url.PathAndQuery;
				Response.Status = "301 Moved Permanently";
				Response.AddHeader("Location", path);
				break;
		}
	}
}
HSTS header only works with HTTPS. So you can not observe it HTTP responses. That’s why redirecting to HTTPS is required. Because if the client uses HTTP all the time and if there is nothing forcing the user to use HTTPS, even if you have HSTS turned on, the client will never receive those responses. So at this point even if an attacker is redirecting the user to HTTP, the browser will always make the requests over HTTPS.
Shortcomings
- Not all browsers support it. It works with Chrome and Firefox but not with IE and Safari
- Cannot protect for the first call: If the user is making a call to a site for the first time and there is an attacker in between it wouldn’t work. At least it would start working after the attacker is finished with the attack and redirected the user back to HTTPS.
Resources