My #1 rule for productivity is “No Snoozing!”. If you snooze, it means you are late for everything you planned to do and that is a terrible way to start your day. This post is about a few tools, tips and techniques I use to prevent snoozing.
Tip #1: Sleep well
This is generally easier said done but there’s no way around it. You MUST get enough sleep. Otherwise, sooner or later your will power will get weaker and weaker. Eventually you’ll succumb to the sweet temptation of more sleep.
Tip #2: Place the alarm away from your bed
This way when your alarm (most likely your phone) goes off you have to make a deliberate attempt to get up and turn it off. If you have to get out of the bed you’re more likely to not to get back to it straight away.
Tip #3: Use multiple alarms with different sounds
It gets easier to wake up if you can surprise yourself! Human beings are so good at adapting to every condition we very easily start getting used and ignore the same alarm sound going off at the exact same time every day. I find it useful to change the alarm times and sounds every now and then.
Tip #4: Use Apple Watch
After Apple Watch Series 4 was released I got myself one.

I’m not sure if it’s worth the cost but when it comes to waking up a little vibration on your wrist can do miracles apparently!
When you have it pair with your iPhone, by default you can stop the alarms from your watch. This may be a nice convenience feature in some cases, but when it comes to waking up we are trying to make it as hard as possible for ourselves to turn the alarms off.
My trick is:
First I disable “Push alerts from iPhone” in the Watch app.
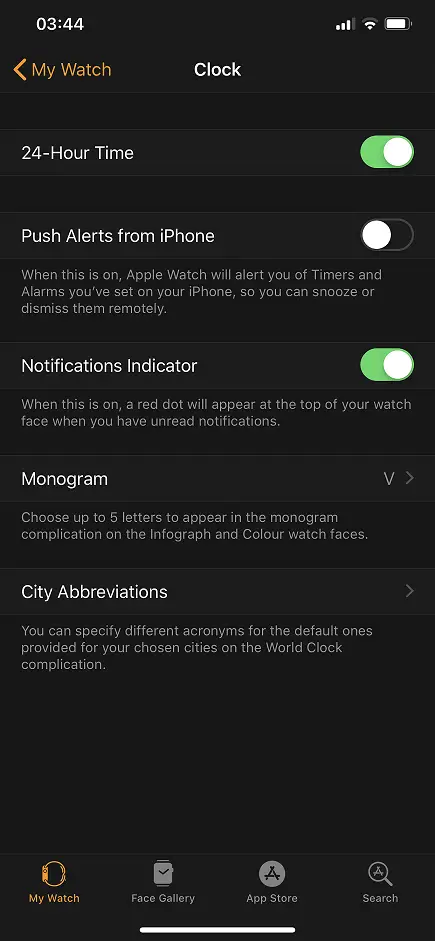
Then I create a separate alarm on watch for the same time.
This way I get 2 alarms at the same time. It’s easy to stop the watch as it’s within my arm’s reach. While the haptic feedback of the watch wakes me up the alarm on the phone also goes off. Now I have to physically get out of the bed to stop that one as well.
Tip #5: Use Alexa
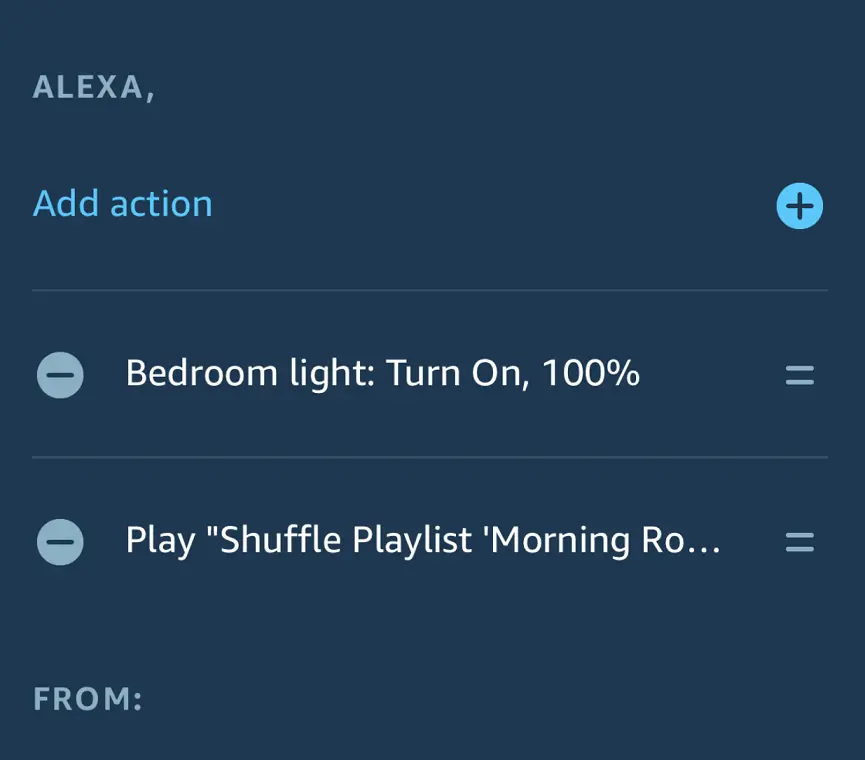
Another gizmo to set an alarm is Alexa but you can do much more than just that with Routines.

Tip #5.1: Play a playlist
This tip requires Spotify Premium subscription.
First, create yourself a nice, loud and heavy playlist of “waking up” music. I prefer energetic Heavy Metal songs from Lamb of God and Slayer. The trick here is to play a random song every morning. Similar to Tip #3, the same song every morning becomes very boring very quickly. But having a random one keeps you surprised every morning. I use this command to play my playlist in shuffle mode:
Shuffle Playlist '{Playlist name}'
Tip #5.2: Turn the lights on
A good sleep tip is to keep your bedroom as dark as possible. That’s why I have all black curtains in my room and it’s quite dark. The downside is it’s so good for sleep it makes waking up even harder!
That’s why I bought myself a Philips Hue smart bulb and as part of my waking up routine Alexa turns it on along with playing the Spotify playlist.
This is what my routine looks like:
Conclusion
For me snoozing is a cardinal sin so I’m always on the lookout for improving my arsenal to fight against snoozing. Hope you find something useful in this post too. If you have tips on your own feel free to leave a comment.
Resources