-->

awssecurity powershell, ec2

Here’s the scenario:

  • You use AWS
  • You don’t have a static IP
  • You connect to your EC2 instances via SSH and/or RDP only from your IP
  • You are too lazy to update the security groups manually when your IP changes!

You’ve come to the right place: I’ve got the solution.

Let’s have a look how it’s built step-by-step:

Step 1: Create an IAM account to access security groups

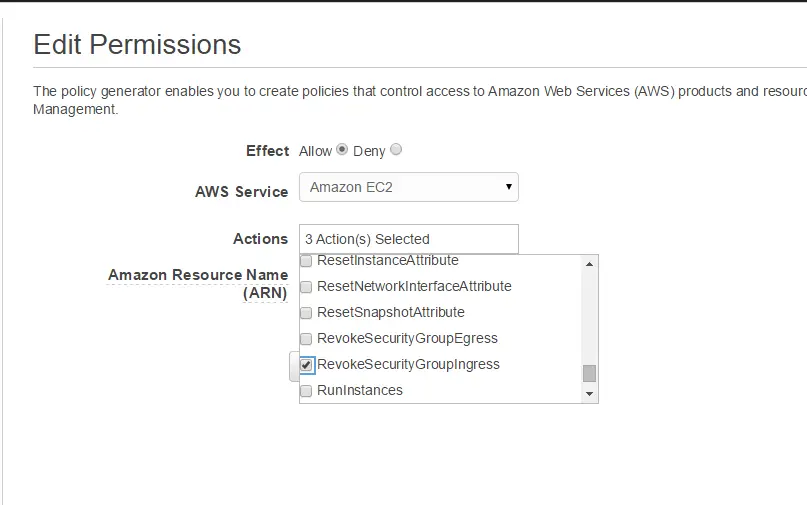
As a general rule of thumb always grant the minimum privileges possible to the accounts you use. Create a new user and go to the user’s details. Select Attach User Policy and then Policy Generator. Select AWS EC2 from the services list. For our script to run we need 3 privileges: List security groups (DescribeSecurityGroups), delete old IP permissions (RevokeSecurityGroupIngress) and add new IP permissions (AuthorizeSecurityGroupIngress).

Alternatively you can just attach the following policy to your user:

{
  "Version": "2012-10-17",
  "Statement": [
    {
      "Sid": "Stmt1418339796000",
      "Effect": "Allow",
      "Action": [
        "ec2:AuthorizeSecurityGroupIngress",
        "ec2:DescribeSecurityGroups",
        "ec2:RevokeSecurityGroupIngress"
      ],
      "Resource": [
        "*"
      ]
    }
  ]
}

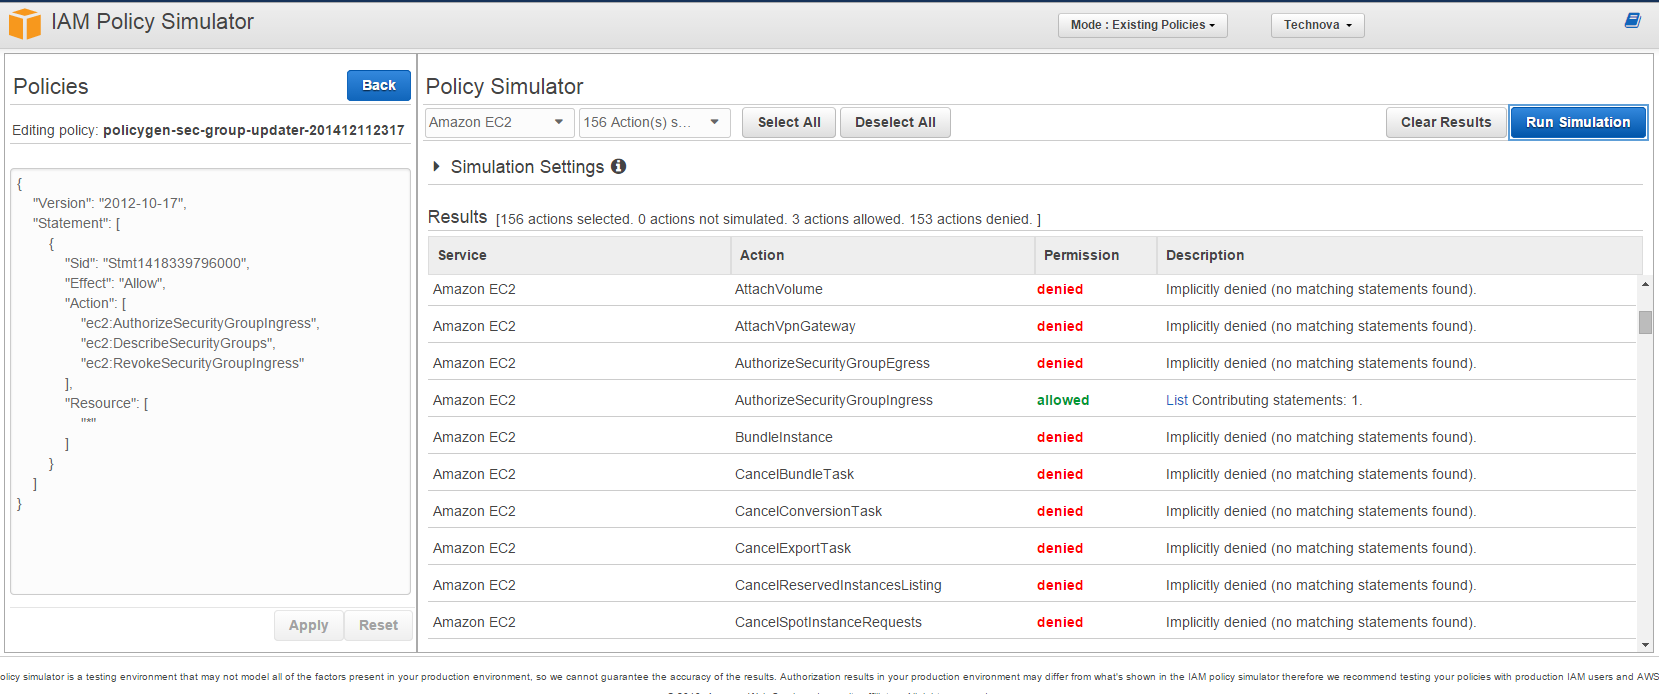
IAM has a very nice simulation feature. Before you proceed I recommend you run it and verify only 3 actions are allowed.

Step 2: Modify the PowerShell script

The script I created is on Gist as seen below. Before you can use it you have to update it with the access and secret keys of the user created above.

Also since fiddling with security groups can become messy very quickly I’d strongly recommend you perform a dry run first. By default $dryRun is set to true. Unless you set it to $false it will only display what it is going to do but will not take any action. So make sure you know what you’re doing before you give it a go. I don’t think this script will be a ready-made script for anyone. Probably would need some tweaking here and there to tailor to your needs. But this version works for me so here it is:

First it gets a list of security groups that have SSH and RDP permissions in them. Then loops through these permissions and compares the IP address with the current one. I used my own external IP checker service that I’ve recently developed as I blogged here. You can use other services as well. Just make sure you change the URL in the script. My service returns a JSON object so if the method you use returns a different format you need to modify the parsing code as well.

If the IP addresses are different, it revokes the old permission and creates a new one with your current IP. Protocol and ports remain intact.

This is the output of the script:

If the IP addresses for port 22 an 3389 are up-to-date it just displays “Security group is up-to-date” so it can be run consecutively. So you can schedule it to run as often as you want.

Resources

securityawsdev raspberry_pi, gadget, powershell, s3

I know there are very cheap security cameras that you can setup in a few minutes. They may provide security but they cannot provide the satisfaction you get after a DIY project! So let’s dig in just for the fun of it.

Ingredients

Component Price Where to buy?
Raspberry Pi Starter Kit £36 Amazon
Camera module £17 Amazon
Protective case for the camera module £4 Amazon
Wireless adaptor £6 Amazon

Once all put together this is what you are going to end up with:

Raspberry Pi Security Camera

Bring it to life

  1. Download a standard distro for Raspberry Pi. I used Rasbian.
  2. Write the image to the SD card. I use Win32 Disk Imager on Windows.

Main course: Motion

There is a great tutorial here for converting your Pi into a security camera which I mostly followed. Basically you enable WiFi, install Motion software and tweak the configuration a bit (image size, framerate etc) and it’s (hopefully) good to go.

The video didn’t work for me unfortunately. It was recording something but only the first frame was visible so it wasn’t any better than a still image. So I decided to ignore videos completely.

Instead of using a network share I decided to upload footage to AWS S3 directly using Amazon S3 Tools. Also don’t forget to clear old footage. Otherwise you can run out of space very quickly. I added a few cron jobs to carry out these tasks for me:

* * * * * s3cmd sync /var/surv/*.jpg s3://{BUCKET NAME}/
* */2 * * * sudo rm /var/surv/*.avi
* */6 * * *  find /var/surv/* -mtime +1 -exec rm {} \;

It syncs the local folder with S3 bucket, deletes all local video files and files older than a day. I delete the video files more frequently as they take up a lot of space.

Monitoring and Notifications

No system is complete without proper monitoring and notifications. It’s especially important for systems like this that’s supposed to run quietly in the background.

Unfortunately in my case it stopped working a few times which made monitoring even more important. I don’t know what’s causing the issue. Maybe it’s because I’m using an older version of Raspberry Pi and it’s not capable of handling all the motion software and S3 uploads etc.

To keep an eye on it, I decided to create a small PowerShell script to check S3 for incoming files and send me a notification if it seems to have stopped uploading.

PowerShell as the glue

Built on .NET framework PowerShell is a very powerful (no pun intended) tool to write quick and dirty solutions. So first here’s the Send-Mail function:

I created a separate function for it as it’s a general-purpose feature which can be used in many places. To make it even more generic you can take out the from and to email addresses and add them as parameters to the function.

And here’s the actual notification logic:

It finds the latest image by sorting them by LastModified field and compares this date with the current date. If it’s been more than 1 day it sends an email. Depending on how often you expect images to be uploaded you can change the alert condition.

To use these scripts you’ll AWS accounts with S3 and SES privileges. Also you have to change the path of the send-mail.ps1 in the line it’s included.

Resources

dev csharp

One of favorite features is the new string formatting using String Interpolation. In the past I encountered a lot of errors while formatting strings especially when preparing log messages. You may need lots of small pieces of data that so after a few iterations you may forget to add new parameters.

For example in the imaginary Log method below only 3 parameters are supplied whereas the string expects 4. It compiles successfully because the string is generated at run-time and it doesn’t check the number curly braces against the number of parameters supplied.

Argument count mismatch error

Using the new feature such errors can be avoided as we can put the values directly in their places in the string:

public class StringInterpolation
{
    public string Log(string timestamp, string application, string error, string status)
    {
        return string.Format("[Timestamp: \{timestamp}], Application: [\{application}], Error: [\{error}], Status [\{status}]");
    }
}

No more parameter mismatch errors!