
Elasticsearch Workout
![]()
I’ve been playing around with Elasticsearch on several occasions. This post is to organize those thoughts and experiences and show an easy way to setup ElasticSearch and start playing around with it.
Setup
Easiest way to setup Elasticsearch locally is using Docker. As of this writing the latest version of Elasticsearch is 7.2.0 and I’ll be using that in this example:
If you don’t already have the image, simply pull from Docker hub:
docker pull docker.elastic.co/elasticsearch/elasticsearch:7.2.0
For development environment suggested command to run a container is
docker run -p 9200:9200 -p 9300:9300 -e "discovery.type=single-node" docker.elastic.co/elasticsearch/elasticsearch:7.2.0
which keeps it very simple and straightforward but in my workout I’d like to insert a whole bunch of data and run some queries on it and I don’t want to re-generate my data over and over again. So I decided to persist my data on host.
Persisting Elasticsearch Data
Instead of running containers one by one in the command line a better approach is to create a docker-compose.yml file file and use Docker compose to start services. I used the sample YAML file provided in official Elastic documentation
version: '2.2'
services:
  es01:
    image: docker.elastic.co/elasticsearch/elasticsearch:7.2.0
    container_name: es01
    environment:
      - node.name=es01
      - discovery.seed_hosts=es02
      - cluster.initial_master_nodes=es01,es02
      - cluster.name=docker-cluster
      - bootstrap.memory_lock=true
      - "ES_JAVA_OPTS=-Xms512m -Xmx512m"
    ulimits:
      memlock:
        soft: -1
        hard: -1
    volumes:
      - esdata01:/usr/share/elasticsearch/data
    ports:
      - 9200:9200
    networks:
      - esnet
  es02:
    image: docker.elastic.co/elasticsearch/elasticsearch:7.2.0
    container_name: es02
    environment:
      - node.name=es02
      - discovery.seed_hosts=es01
      - cluster.initial_master_nodes=es01,es02
      - cluster.name=docker-cluster
      - bootstrap.memory_lock=true
      - "ES_JAVA_OPTS=-Xms512m -Xmx512m"
    ulimits:
      memlock:
        soft: -1
        hard: -1
    volumes:
      - esdata02:/usr/share/elasticsearch/data
    networks:
      - esnet

volumes:
  esdata01:
    driver: local
  esdata02:
    driver: local

networks:
  esnet:
This example creates an Elasticsearch cluster with 2 nodes and uses named volumes to persist data so next time when we bring this cluster up again we should be able to continue where we left off data-wise.
Sample Application
In my previous blog post I developed a simple test data generator to generate fake bank statement data with a library called Bogus. In this project, I will use that generator to generate lots and lots of test data, insert them into Elasticsearch and have fun with it!
When you start a C# project and start looking for a library to interact with Elasticsearch, it’s a bit confusing to find out there are actually two of them: Elasticsearch.net and NEST. The gist of it is NEST is a high-level library that uses Elasticsearch.net under the hood. It also exposes low-level client so that it actually enhances Elasticsearch.net and allows using strongly typed DSL queries. In the sample application I used NEST.
Creating Elasticsearch client
Creating a client with some basic settings is straightforward:
using (var connectionSettings = new ConnectionSettings(new Uri("http://localhost:9200")))
{
    var settings = connectionSettings
        .DefaultIndex("bankstatementindex")
        .ThrowExceptions(true);
	IElasticClient elasticClient = new ElasticClient(settings);
}
Indexing data
To index a single document **IndexDocument
elasticClient.IndexDocument<BankStatementLine>(testData.First());
For multiple documents, IndexMany method should be called. If the data size too large then using BulkAll method and BulkAllObservable helper is recommended.
To see the difference I created a test to index 5,000 documents with a looping over the array and using BulkAll after that. Looping over the collection took around 26 seconds whereas bulk index took only 1.2 seconds as shown in the screenshot.
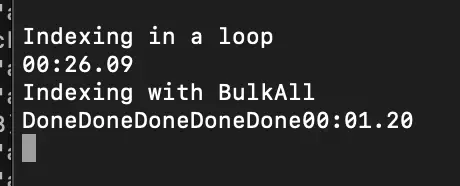
Also it displays “Done” 5 times because I set the size to 1,000 and I requested 5,000 documents to be indexed so it automatically divided the load into 5 and made 5 calls:
var bulkAll = elasticClient.BulkAll(testData, x => x
                .BackOffRetries(2)
                .BackOffTime("30s")
                .RefreshOnCompleted(true)
                .MaxDegreeOfParallelism(4)
                .Size(1000));

bulkAll.Wait(TimeSpan.FromSeconds(60),
    onNext: (b) => { Console.Write("Done"); }
);
Same result can also be achieved by subscribing to BulkAll observer:
var waitHandle = new CountdownEvent(1);

bulkAll.Subscribe(new BulkAllObserver(
    onNext: (b) => { Console.Write("."); },
    onError: (e) => { throw e; },
    onCompleted: () => waitHandle.Signal()
));

waitHandle.Wait();
Showing progress
In the sample code below I showed displaying progress using onNext action delegate:
var testData = dataGen.Generate(statementConfig.StartDate, statementConfig.EndDate, statementConfig.OpeningBalance, statementConfig.DebitTransactionRatio, statementConfig.TransactionDateInterval, statementConfig.NumberOfStatementLines);
var cancellationToken = new CancellationToken();
var batchSize = 250;
var bulkAll = elasticClient.BulkAll(testData, x => x
    .BackOffRetries(2)
    .BackOffTime("30s")
    .RefreshOnCompleted(true)
    .MaxDegreeOfParallelism(4)
    .Size(batchSize), cancellationToken);
var totalIndexed = 0;
var stopWatch = new Stopwatch();
stopWatch.Start();
bulkAll.Wait(TimeSpan.FromSeconds(60),
    onNext: (b) =>
    {
        totalIndexed += batchSize;
        Console.WriteLine($"Total indexed documents: {totalIndexed}");
    }
);
and the output looked like this:
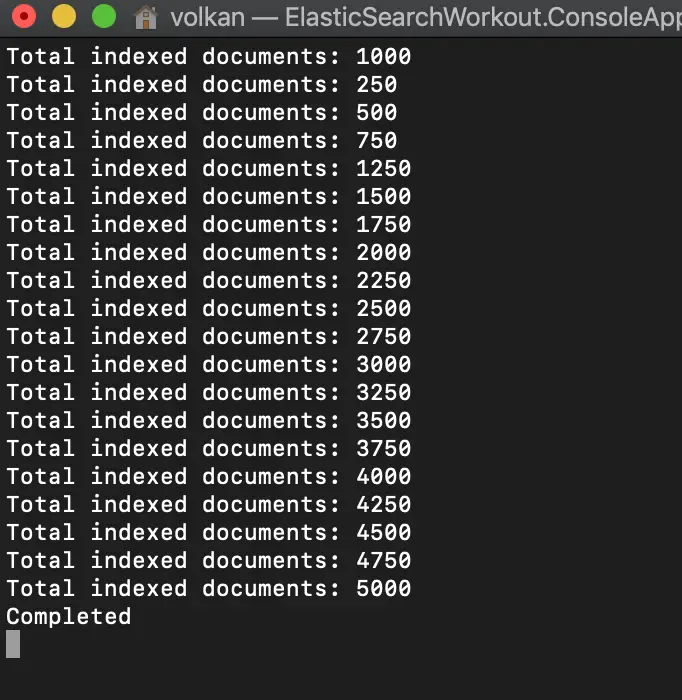
Even though the numbers seem a bit wonky I think it’s a good example to illustrate the multi-threaded nature of BulkAll. Because I set the maximum degree of paralleism to 4 and first 1,000 were inserted in a mixed order suggesting that they were running in parallel.
Cancellation with bulk operations
BulkAll observer can also be cancelled for longer processes if necessary. The code excerpt below shows the relevant pieces to cancellation
var cancellationTokenSource = new CancellationTokenSource();
var cancellationToken = cancellationTokenSource.Token;
var batchSize = 250;
var bulkAll = elasticClient.BulkAll(testData, x => x
    .BackOffRetries(2)
    .BackOffTime("30s")
    .RefreshOnCompleted(true)
    .MaxDegreeOfParallelism(4)
    .Size(batchSize), cancellationToken);
var totalIndexed = 0;
var stopWatch = new Stopwatch();
stopWatch.Start();
Task.Factory.StartNew(() =>
    {
        Console.WriteLine("Started monitor thread");
        var cancelled = false;
        while (!cancelled)
        {
            if (stopWatch.Elapsed >= TimeSpan.FromSeconds(60))
            {
                if (cancellationToken.CanBeCanceled)
                {
                    Console.WriteLine($"Cancelling. Elapsed time: {stopWatch.Elapsed.ToString("mm\\:ss\\.ff")}");
                    cancellationTokenSource.Cancel();
                    cancelled = true;
                }
            }

            Thread.Sleep(100);
        }
    }
);

try
{
    bulkAll.Wait(TimeSpan.FromSeconds(60),
        onNext: (b) =>
        {
            totalIndexed += batchSize;
            Console.WriteLine($"Total indexed documents: {totalIndexed}");
        }
    );
}
catch (OperationCanceledException e)
{
    Console.WriteLine($"Taking longer than allowed. Cancelled.");
}
Querying Data
Querying data can be done by calling Search method of ElasticsearchClient. Here’s a few examples below. There are more in the sample accompanying source code:
// Get the first 100 documents
var searchResponse = elasticClient.Search<BankStatementLine>(s => s
    .Query(q => q
        .MatchAll()
    )
    .Size(100)
);
// Get transactions with date between 01/01/2018 and 10/01/2018
var searchResponse = elasticClient.Search<BankStatementLine>(s => s
    .Query(q => q
        .DateRange(x => x
            .Field(f => f.TransactionDate)
            .GreaterThanOrEquals(new DateTime(2018, 01, 01))
            .LessThanOrEquals(new DateTime(2018, 01, 10))
        )
    )
    .Size(10000)
);
Deleting data
For my tests I had to delete all frequently and it can be achieved by running the query below:
elasticClient.DeleteByQuery<BankStatementLine>(del => del
    .Query(q => q.QueryString(qs => qs.Query("*")))
);
Source Code
Sample application can be found under blog/ElasticsearchWorkout folder in the repository.