
On cloud nine!
I’ve been postponing this for a long time but finally I did it: I started using AWS (Amazon Web Services). My blog doesn’t get too much traffic so actually I don’t need the scalability which is EC2’s strongest point but I wanted to play with the cloud so decided to move my blog first. It’s quite easy to do so and I’ll explain how to migrate your existing blog to cloud within minutes:
STEP 01: Backup your existing blog
mysqldump -u root –p {database name} > blog_backup.sql
Download your wordpress installation folder and the backup you just created from your existing server. I Used WinSCP to get my files. It can be downloaded here.
STEP 02: Create AWS EC2 instance
Fun part starts now. Login to your AWS account and go to EC2 console. Click Launch Instance and follow the wizard. For my blog, I selected a Micro instance but it depends on your needs. I selected a 64-bit Amazon Linux AMI for the instance.
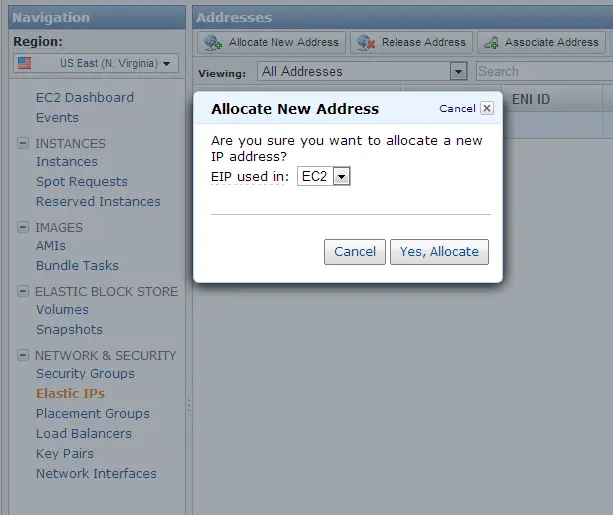
STEP 03: Assign an IP to your server*</span>
Our machine has just started running but to update our domain’s DNS records we need an IP. On the left menu, click the Elastic IPs link and allocate a new IP address. The IPs assigned to EC2 instances are free.
Right click on the IP and select Associate and choose your instance. After this step we have a running machine with a public IP.
STEP 04: SSH into the machine
By default SSH is enabled you must have created a keypair to access your machine during the Step 2. I use putty to as my SSH client which can be downloaded from here. It’s best to switch to root during the installations. So type:
sudo su
STEP 05: Install required programs
First install Apache:
yum install httpd
Then PHP:
yum install php php-mysql
Then MySQL:
yum install mysql-server
If you use SSL like me you also need to install SSL module for Apache:
yum install mod_ssl
Start Apache and MySQL
service httpd start
service mysqld start
STEP 06: Customize MySQL and import your blog
- Run the following command to set root password and harden the default installation
mysql_secure_installation
- Login to MySQL
mysql -u root –p
-
Create your database, user and grant access to that user
create database {database name};
create user ‘{user name}’@’localhost’ identified by ‘{password}’;
grant all privileges on {database name}.* to ‘{user name}’@’localhost’ with grant option;
- Switch to database and import data
use {database name}’;
source {path/to/mysqldump file you uploaded}
STEP 07: Copy blog files
Copy the Wordpress files you uploaded under /var/www/html/{directory name}
STEP 08: Configure Apache
Enter the command to edit configration file:
vi /etc/httpd/conf/httpd.conf
Go down to the end of the file and create a new virtual host by this:
NameVirtualHost *:80
<VirtualHost *:80>
	ServerAdmin webmaster@localhost
	DocumentRoot /var/www/html/{directory name}
	ServerName {Your domain name}
	ServerAlias www.{Your domain name}
</VirtualHost>
And restart the Apache service:
service httpd restart
STEP 09: Enable access to FTP, HTTP and HTTPS
One last step before testing your blog is opening port 21 (for installing themes, plugins etc.) 80 (for viewing!), and 443 (if you’re going to use SSL) on the AWS EC2 console. For this, click on the Security Groups on the left menu. Add the ports and press Add Rule and then Apply Rule Changes.
STEP 10: Install FTP server
- Enter the following command and install the FTP server:
yum install vsftpd
- Create a certificate to be used with FTPS connections:
openssl req -x509 -nodes -days 365 -newkey rsa:1024 -keyout /etc/vsftpd/vsftpd.pem -out /etc/vsftpd/vsftpd.pem
- Edit the configuration file:
vi /etc/vsftpd/vsftpd.conf
Disable anonymous access and add these lines to the end of the file. Then save the file and exit:
ssl_enable=YES allow_anon_ssl=NO force_local_data_ssl=NO force_local_logins_ssl=NO ssl_tlsv1=YES ssl_sslv2=NO ssl_sslv3=NO rsa_cert_file=/etc/vsftpd/vsftpd.pem - Start the service
service vsftpd start
-
Create a user for FTP access and set the password
useradd {user name} passwd {user name}
STEP 11 (Optional):
If you don’t want to enter the FTP credentials every time, you can
set them in the wp-config.php file:
 define('FTP_BASE', '/var/www/html/{folder name}/');
 define('FTP_CONTENT_DIR', '/var/www/html/{folder name}/wp-content/');
 define('FTP_PLUGIN_DIR ', '/var/www/html/{folder name}/wp-content/plugins/');
 define('FTP_USER', '{user name}');
 define('FTP_PASS', '{password});
 define('FTP_HOST', {hostname]');
 define('FTP_SSL', true);
STEP 12 (Optional): Install SSL certificate for the blog
This step is optional, but using SSL is strongly recommended when connecting to your blog as administrator
Upload your private key and certificate files to your server and copy them under SSL folder:
mkdir /etc/ssl/private<br />
mv filename.key /etc/ssl/private/<br />
mv filename.crt /etc/ssl/certs/<br />
mv CARootCert.crt /etc/ssl/certs/<br />
Modify Apache configuration file for SSL:
NameVirtualHost *:443
<VirtualHost *:443>
 DocumentRoot /var/www/html/{folder name}
 ServerName {domain name}
 ServerAlias www.{domain name}
 SSLEngine on
 SSLProtocol all –SSLv2
 SSLCipherSuite ALL:!ADH:!EXPORT:!SSLv2:RC4+RSA:+HIGH:+MEDIUM:+LOW
 SSLCertificateFile /etc/ssl/certs/filename.crt
 SSLCertificateKeyFile /etc/ssl/private/filename.key
 SSLCACertificateFile /etc/ssl/certs/CARootCert.crt
</VirtualHost>
STEP 13 (Optional):
If you get an “Unable to locate Themes directory” error add the following snippet to wp-config.php.
if(is_admin()) {
 add_filter('filesystem_method', create_function('$a', 'return "direct";' ));
 define( 'FS_CHMOD_DIR', 0751 );
 }
STEP 14: Enjoy!
That’s it! You installed a Wordpress application, imported your old posts, secured your blog with FTPS and HTTPS access. Time to celebrate!